|
|
Post by cherrysteven on Jun 23, 2014 3:28:51 GMT -5
Don't know how to transfer iPhone files to computer for backup, or want to put files on iPhone? Just let iPhone Transfer Platinum do it! iPhone Transfer Platinum can be your best iPhone manger to help you transfer various files like music/movie/Pictures/TV Shows/Podcast/iTunes U/eBooks/Camera Roll/Ringtone/SMS/Contacts/Voice memos/Camera shot files from iPhone to PC or iTunes. Import ing video, movie, image, ringtone eBook and other files to iPhone is also possible. Further more, it can even rip DVD and convert video to any popular video & audio format without any quality loss. This tutorial is going to teach you how to transfer iPhone files including music/movie/Pictures/TV Shows/Podcast/iTunes U/eBooks/Camera Roll/Ringtone/SMS/Contacts/Voice memos/Camera shot..etc. Let's start to follow this guide now! Step 1: Free download iPhone Transfer PlatinumIf you need to run the software on Mac OS, please download the DVD to Surface Converter Mac.   Download and double click iPhone Transfer Platinum installation file and then launch iPhone Transfer Platinum, and the registration window will pop up automatically. You can enter correct User Name and registration key to finish registration, or you can just skip the step to try this iPhone transfer firstly.  Step 2: Make iPhone Connected to computer Step 2: Make iPhone Connected to computerAfter registration, you will see the below screenshot.  Connect iPhone to computer and it will be recognized instantly, and the detailed information of iPhone will be displayed on the main interface of this program, including type, capacity, version and serial number. Except that, it will show the specific capacity values of different iPhone files which have taken, and the available space.  Step 3: Transfer iPhone files to PC Step 3: Transfer iPhone files to PCOn the left side of the main interface, the display list will show various iPhone files in different types. You can freely choose any kind of file type(music, movie, TV shows, Podcast, iTunes U, Ringtones, Books, pictures/Cameare Roll, Voice Memo, Camera Shot, SMS and Contacts) to transfer to your PC for file safety or other use. Here we take the example of transferring iPhone songs to computer.  Click "Music" on the display list, then all music files in details will be showed on the its interface. In front of each listed music file, there is a check box, you can check all to choose all music files or just one to choose, then click "iPhone to PC" image button on the bottom of the interface to start transferring music files from iPhone to PC. |
|
|
|
Post by cherrysteven on Jun 23, 2014 22:06:21 GMT -5
Apple fans must be thrilled recently since a new generation of Apple device - iPhone 5S was unveiled on September, 10. 2013. There is no surprise its appearance with 4 inch display and Retina-class 1,136x640 resolution panel, but iPhone 5S still becomes new fever on the market. Shipped with an A7 CPU, it should be up to 40x faster in terms of CPU performance and 56x faster for GPU tasks than the original iPhone. Meanwhile, the new iPhone 5S is the first smartphone to take advantage of the 64-bit version of iOS 7. Plus, the new biggest spotlight to the iPhone 5S is the TouchID ring built into the home button. This silver ring acts as a fingerprint reader for enhanced security. It can read in any orientation and scans below the epidermal skin layers. All these features, for better or for worse, contribute to the new iPhone 5S, Apple’s new favor. While same as its previous generations, iPhone 5S fails to play videos like DVD movies unless you convert DVD to iPhone 5S compatible format in advance. 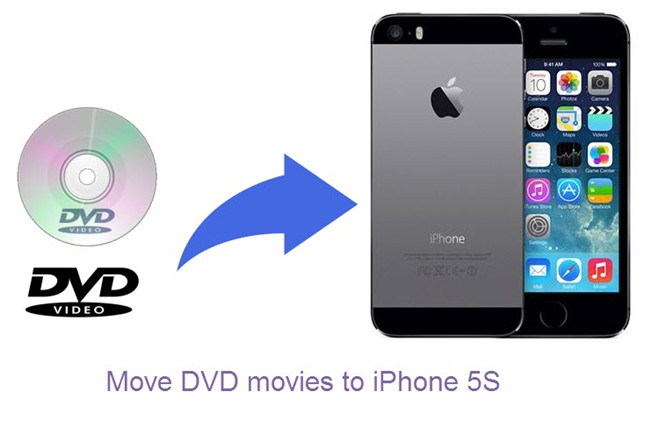 Before you get the DVD to iPhone 5S conversion started, feel free to download DVD to iPhone 5S Converter with below link and then install, run it on your computer.   How to convert and move DVD movies to iPhone 5S for watching smoothly? Step 1: How to convert and move DVD movies to iPhone 5S for watching smoothly? Step 1: Load DVD movie Insert your DVD into disc drive, click the “Load Disc” button on main interface to locate the source disc and import. Step 2: Select DVD to iPhone 5S optimized format iPhone 5 is compatible with M4V, MP4, MOV video files and AAC, MP3, WAV audio formats, so you are suggested to apply similar profile under iPad category from Format drop-down list. Step 3: Convert DVD to iPhone 5S You are ready to convert DVD to iPhone 5S now. Just hit the “Convert” button on DVD Ripper main interface and the DVD to iPhone 5S conversion begins. Once it completes, locate the created MP4 movies by clicking the “Open” icon and you could transfer the ripped DVD movie to iPhone 5S for entertainment. |
|
|
|
Post by cherrysteven on Jun 24, 2014 22:35:10 GMT -5
The second generation Google Nexus 7 comes with Android 4.3, Jelly Bean - the latest version of the world’s most popular mobile operating system, so it’s fast, fun, and easy to make your own, according to Google. Google also declares the Nexus 7 2013 version features the sharpest 7" tablet screen ever. With 323 pixels packed into every inch, you can view images more vivid than the highest quality photo magazine, read text that’s sharper than the printed page, and see videos come to life in vibrant Full HD 1080p quality.  Have you ever thought of putting some movies in your DVD collection to the device for entertainment? With up to 9 hours of HD video playback, you will find there are plenty of funs to get you through the day with your favorite DVD movies. But some of you may probably doubt that there isn’t a DVD drive inside the device, then how to realize DVD playback on the second generation Nexus 7? As a matter of fact, a DVD Ripping program is all you need to do so. Considering the easy-of-use, the perfect audio and video synchronization, the fast conversion speed and the great image and sound quality, DVD Ripper Platinum would be one of our highly recommended programs. Besides the Windows version, the software manufacturer also released a Mac version DVD Ripper Platinum for Apple fans. Download DVD Ripper Platinum for Google Nexus 7 2013   Rip DVDs to Nexus 7 2nd Gen compatible video using DVD Ripper Platinum1. Load DVD Rip DVDs to Nexus 7 2nd Gen compatible video using DVD Ripper Platinum1. Load DVD Launch DVD Ripper Platinum, click “Load file(s)” icon to load your DVD movie.  2. Set subtitles stream and audio track 2. Set subtitles stream and audio track By clicking the dropdown list of “Subtitles” and “Audio”, you are able to select one of your wanted subs and audio tracks to be preserved in the output file. 3. Choose output format for the second generation Google Nexus 7 From the Format menu, navigate to “Android” catalog and choose “Google Nexus 7 H.264 Video (*.mp4)” as target format.  Generally speaking, this Nexus 7 format ensures a well playback quality on your device. In case that you would like to customize the file quality by yourself, you can click “Settings” button and go to “Profile Settings” panel to adjust video and audio parameters such as video codec, size, bit rate, frame rate, audio codec, sample rate, and audio channels. 4. Start conversion Once the above mentioned steps finished, click “Convert” button in the bottom right corner to start conversion. When the conversion finished, you can either click the “Open output folder” icon in the conversion window or the “Open” button in the main interface to get the generated MP4 files for using with the second generation Google Nexus 7.  |
|
|
|
Post by cherrysteven on Jun 25, 2014 22:14:35 GMT -5
Separately powered with Intel and ARM chip, these Surface Tablets are born with so many expectations. Featured a 10.6-inch, 16:9 widescreen ClearType HD Display, both Windows RT and Windows 8 Pro are ideal for movie and TV show watching. However, Surface still not comes with DVD-ROM the same as other Tablets. So if you want to play your favorite DVD movies on Surface RT or Pro, you'll need to convert DVD to Microsoft Surface supported video files such as MP4 first and then transfer them to your Tablet for playback.  To achieve your goal smoothly, below is a great tutorial for you, which mainly tells you how to transfer and play DVD movies on Surface Windows RT and Windows 8 Pro Tablet easily and fast. Just follow it. Free Download the App:DVD Ripper PlatinumIf you need to run the software on Mac OS, please download the DVD to Surface Converter Mac. The program is an easy-to-use and wonderful DVD ripping tool to help you convert both homemade and commercial DVD movies to Microsoft Surface MP4 videos for unlimited playback. Besides, it can also rip DVD to all other popular video formats like AVI, MOV, MKV, WMV, FLV, MPG, etc. for playing and sharing on iPhone, iPad, Archos, Zen, Blackberry, Samsung, Asus, etc. All you have to do is load the DVD (ISO, IFO, DVD Folder) movies, choose the output format as "Microsoft Surface" and wait to get the videos with optimized settings for playback on Surface RT or Pro. Just download the right version and follow the below guide to download and put DVD movies onto Microsoft Surface Windows RT or Windows 8 Pro for smoothly playback. How to Convert DVD to Microsoft Surface Tablet compatible video formatsThe below guide uses DVD Ripper Windows screenshots. The way ripping DVD movies to Surface on Mac is almost the same. Just make sure you get the right version.  1. Import DVD movies 1. Import DVD moviesClick "DVD Disc" button to choose and import DVD movies from your computer's hard drive to the program. As you can see, added files can be previewed on the right viewing window. You can adjust the video volume and take snapshots of your favorite movie scenes. 2. Select output formatClick "Format" bar, you can get optimized videos for Surface Tablets under "Windows > Microsoft Surface Windows RT H.264 Video (*.mp4)". If you like, you can click "Settings" to change the video encoder, resolution, frame rate, etc. as you wish. 3. Start Ripping DVD to Microsoft SurfaceAfter all the above settings, simply click "Convert" button to start converting DVD files to Surface MP4 video. Just wait for the converting process to be done. After that, find the converted videos in your output folder and transfer them your Surface Tablet with cable. In this way, you can play DVD movies on Microsoft Surface Windows RT and Windows 8 Pro and enjoy them on the go. |
|
|
|
Post by cherrysteven on Jun 27, 2014 1:13:13 GMT -5
P2 camera-recorders like Panasonic AJ-HPX3700 record AV data as MXF (Material Exchanged File) files with metadata. It can record the metadata onto the clips scene by scene when it loaded from SD/ SDHC card containing the shooting information. This is very convenient for videographers and TV broadcasting makers to edit the MXF footage in professional editing software (e.g. Adobe Premiere CS5). The non-linear editing system supporting P2 can instantly start editing by mounting the P2 cards and can edit the clips in the P2 cards directly. However, the MXF files are not so well-suited when you feel like backing them up to PC or hard drive. As we all know, the P2 MXF format means high quality and huge file size. When recording in AVC-Intra 100 mode, a 64GB P2 card can be filled up in 64 minutes. It takes long time to copy the HD MXF files, and astonishing space to save them. This guide provides you solution for this issue: converting AJ-HPX3700 HD MXF to MPEG files and cut the file size down. 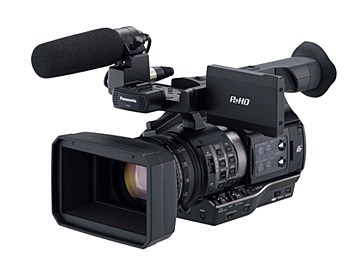 Software you'll need: MXF ConverterStep 1. Import P2 MXF to the powerful MXF Converter. Run the MXF Converter, click “Add video” or “Add from folder” button to load the MXF files you’d like to convert. When the MXF footages are loaded to the program, you can view the videos from the Preview window. Simply select an item and click the “Play” button. When the video is playing, you may take snapshot when it plays to your favorable frame. Simply click the “Snapshoot” button. 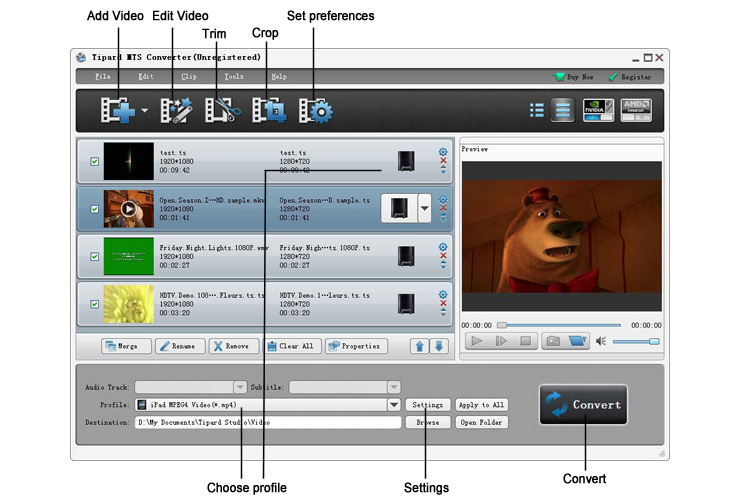 Step 2. Select output format Step 2. Select output format The MXF Converter is capable of converting MXF files to various HD and SD video formats. For converting MXF video to MPEG, you just need to click on the “Format” bar and select desired MPEG format from the profile list. In the tab of “Common Video”, MPEG-1 and MPEG-2 encoded SD formats are available. If you’d like to remain HD video quality, please find MPEG-2 and MPEG-4 encoded HD MPG, TS and MP4 format in “HD Video”.  Step 3. Edit MXF files Step 3. Edit MXF filesClick "Clip">> "Trim"/"Crop"/"Effect"/"Watermark" to edit videos. You are allowed to make videos into clips by setting its start time and end time; cut down the undesired or black edge or enlarge a certain part of video screen; adjust video brightness, hue, saturation, contrast and add picture/text to video as watermark.  Step4: Start to convert Step4: Start to convertHit the "Convert" image button to start the MXF file to video conversion.  |
|
|
|
Post by cherrysteven on Jun 29, 2014 21:49:48 GMT -5
The Playstation 3, the first Blu-Ray player commercially available on the market, not only supports Blu-ray/DVD movies, but also allows users to play games on it. While searching online with the keyword “PS3 play Blu-ray movie”, so many posts are appeared, posting issues with PS3 playing Blu-ray movies. In other words, PS3 claims it is compatible with Blu-ray discs, but you would come across Blu-ray playback issue more or less.  How to get 1080p Blu-ray movies always playable on PS3? You need convert Blu-ray to PS3 compatible video format in advance. Blu-ray to PS3 Ripper is a Blu-ray converter as well as a disk decrypter. It is specially designed for users who would like to rip their Blu-ray collection to PS3 playable movies. This professional Blu-ray Ripper also supports converting DVD disc, DVD ISO and DVD folder to virtually any video and audio formats like MP4, AVI, MKV, WMV, MPEG-4, MOV, WMA, etc. In addition, this app offers users the option to edit video, you can clip video, split one title into several segments, crop black bars, and more features are available in Blu-ray to PS3 Ripper. This guide here will help you easily convert your Blu-ray movies to PS3 acceptable MP4 video. Download Blu-ray Converter: 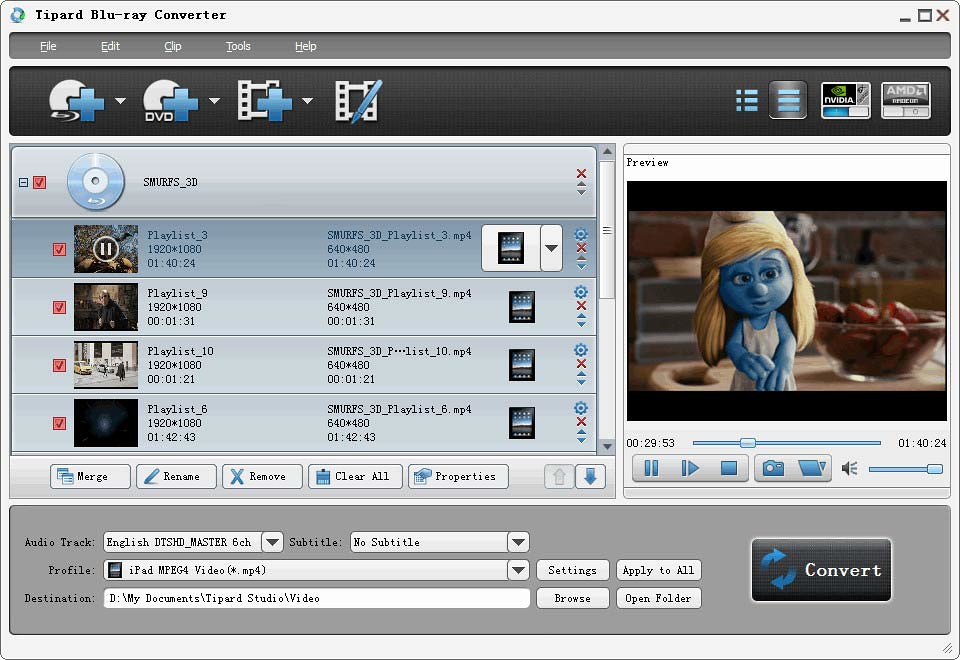 Step 1. Import Blu-ray movie to the Blu-ray to PS3 Ripper Step 1. Import Blu-ray movie to the Blu-ray to PS3 RipperClick the “Load Disc” icon to browse disc drive and load your Blu-ray Disc. Step 2. Choose output format for PS3From the Format list, find “PSP/PS3” catalog and get the optimized profile for your device. To preserve high video quality from original 1080p Blu-ray movie on PS3, you are suggested to select “PS3 Video(1080P) MPEG-4(*.mp4)” for Blu-ray to PS3 conversion. Step 3. Customize movie settings and effect (Optional)Blu-ray Ripper, regarded as a professional disk ripping and editing tool, allows user to customize video and audio parameters, such as video code, audio codec, video size, video bitrate, frame rate, etc to get better video and audio playback on PS3. Step 4. Start the Blu-ray to PS3 conversionDouble check above steps and you could start the Blu-ray to PS3 conversion. When it is complete, go to output destination, locate the created PS3 MP4 file, and move your Blu-ray movies to PS3. |
|
|
|
Post by cherrysteven on Jun 30, 2014 21:27:33 GMT -5
From the Amazon Kindle Fire product page these are the Content Formats the Kindle Fire HD supports: Kindle (AZW), KF8, TXT, PDF, unprotected MOBI, PRC natively, Audible Enhanced format (AAX), DOC, DOCX, JPEG, GIF, PNG, BMP, non-DRM AAC, MP3, MIDI, PCM/WAVE, OGG, WAV, MP4, AAC LC/LTP, HE-AACv1, HE-AACv2, AMR-NB, AMR-WB, HTML5, CSS3, MP4, 3GP, VP8(.webm)  Anything you have not in one of these formats will need to be converted. With the new Kindle Fire HD are you able to download already existing AVI onto the device to watch them? The answer is “NO”. As neither Amazon nor its subsidiaries provide any content in .avi format that may be the reason it's not supported. If that is the case, Kindle Fire HD owners need to render AVI movies to MP4 for smooth playback on their Amazon tablets. MP4 is quite good, and you will find a lot of HD movies display beautifully in this format. It is beyond simple to download Video Converter Platinum to quickly and easily convert AVI to MP4 for your Kindle Fire HD device. Here comes a step-by-step instruction. Required software: Video Converter Platinum (here in this article we simply run it as an AVI to MP4 converter for Kindle Fire HD). How to render AVI movies to MP4 for Kindle Fire HD?1. Add DivX/Xvid AVI movies for AVI to Kindle Fire HD conversion Launch Video Converter Ultimate as the best HD AVI to Kindle Fire HD Converter, and click “Add video” or “Add from folder” button to load your source files in .avi format. As a versatile HD video to Kindle Fire HD Converter, you can also import 1080p MKV files and other HD media into this software to do format conversion. 2. Select MP4 as output format for Amazon Kindle Fire HD Video Converter Ultimate features optimal H.264 MP4 format for Amazon Kindle Fire HD. To choose a proper format for Kindle Fire HD, you can follow: “Format menu” > “Android” > “Amazon Kindle Fire HD H.264 (*.mp4)” 3. Custom image and sound quality for Kindle Fire HD (optional) You can click “Settings” button and go to “Profile Settings” panel to adjust video and audio parameters. By default, the “Amazon Kindle Fire HD H.264 (*.mp4)” profile uses the following video and audio settings: Video Encoder: H.264, Audio Encoder: AAC Resolution: 1280*800, Video Bitrate: 1500 kbps, Frame Rate: Original Audio Sample Rate: 44100 hz, Audio bit rate: 128000 bps, Audio Channels: Stereo 4. Convert AVI files to Amazon Kindle Fire HD optimized H.264 MP4Click “Convert” button to start rendering AVI video to Kindle Fire HD preferred MP4 video. If you don’t’ want to wait around for the entire conversion process, you can tick off the checkbox before “Shut down computer after conversion”. When conversion completes you can click “Open” button to get the generated files and transfer these MP4 videos to Your Kindle Fire HD via USB connection. |
|
|
|
Post by cherrysteven on Jul 1, 2014 21:03:14 GMT -5
Have you got a lot of VOB videos that have been ripped from DVD discs? Though many devices have been announced to support VOB video for playback, the new iPad is not included. So, it is impossible for you to play VOB movie on the new iPad. This problem can be easily solved by converting VOB video to the new iPad 3 with 720p HD video quality kept. This article is mainly a useful guide for you to convert VOB to iPad 3 on your computer. What you need: Video Converter PlatinumFree Download Here:   Video Converter Platinum Video Converter Platinum is the best VOB to the new iPad converter which helps you transcode VOB movies for the new iPad 3 on Mac and enable you play VOB movie on the new iPad with ease. Guide: How to convert VOB to iPad 3 on computer?Step 1: Import VOB videos to Video Converter Platinum.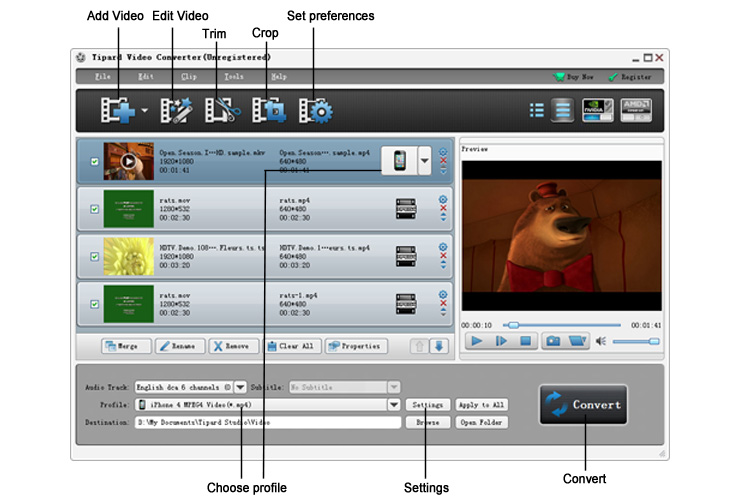 Just launch the VOB to iPad 3 converter and click the add button to import the VOB files to the program. Step 2: Select H.264 codec format for the new iPad.The new iPad supports well with the H.264 codec videos. In order to put VOB video to the new iPad, you are recommended click the format bar and choose iPad >> iPad 3 HD Video (*.mp4). Step 3: Optimize the profile settings for VOB to the new iPad 3 conversion.The default settings can export the 720p HD video for the new iPad 3, if you need a smaller file size, just click the settings button and change the video size by yourself. 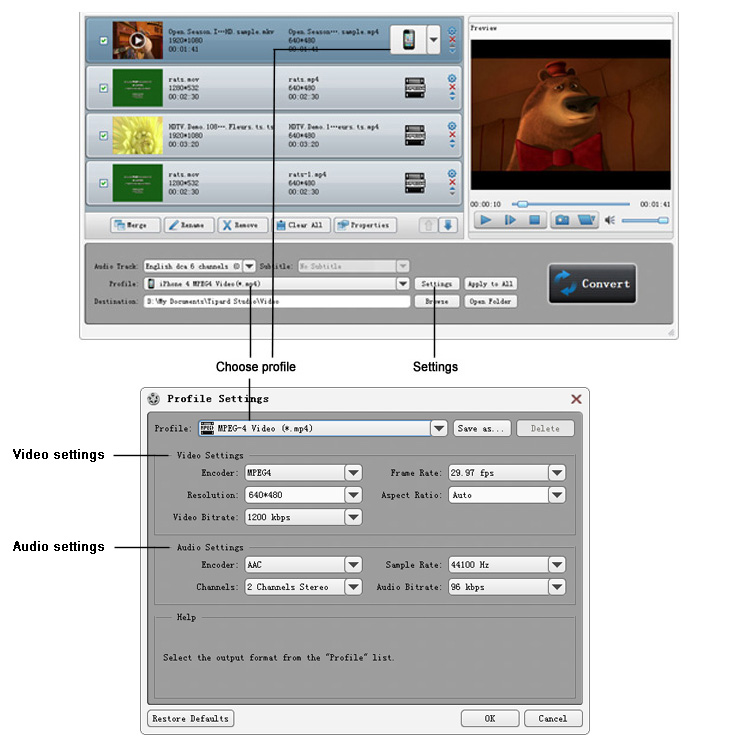 Step 4: Convert VOB to the new iPad 3 MP4 video. Step 4: Convert VOB to the new iPad 3 MP4 video.The last step is to click the convert button to start convert VOB to the new iPad 3 MP4 video. The conversion won’t take much time before finished and after that you can play VOB movie on the new iPad by transferring the converted MP4 videos to your new iPad. 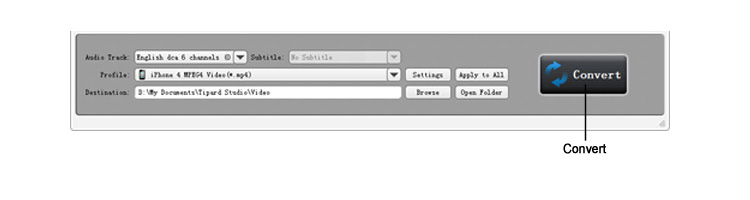 |
|
|
|
Post by cherrysteven on Jul 2, 2014 21:10:37 GMT -5
 Why we love the Canon PowerShot S95? Particularly because it not only delivers spectacular photos, but also lets you record video in beautiful high definition (1280 x 720 pixels). The camera also makes it easy to enjoy HD videos and still photos on your HDTV. It's great that the Canon S95 can shoot in 720 HD but when loading the H.264/MOV videos for editing, many new users get involved in issues like load error and momentary glitch. This is because the HD MOV clips are encoded in H.264 codec, a most advanced codec that compresses video in highest compression ratio, but not so acceptable for editing software such as Magix Edit Pro, Sony Vegas, and Adobe Premiere. Generally speaking, editing software prefer AVI, WMV, MPG to H.264 encoded MOV, MTS, TOD footage. Convert Canon Powershot S95 mov to aviIf you’re caught by the editing issues of Canon Powershot S95 footage, I advise you converts the H.264 MOV files to AVI or WMV with Video Converter Platinum before editing. Why Video Converter Platinum? Basically, it does a good job in converting H.264 .mov files to AVI, WMV formats for editing in sync and not looses much quality. And it allows you to join the Canon Powershot S95 clips together, and add audio track to the video as background music. Does it convert MOV to AVI fast? Well I haven’t found a faster one so far. Downloaded Video Converter Platinum and get your Canon Powershot S95 .mov files converted to .avi or .wmv format as it shows below: Step 1. Load H.264 .mov footage to Canon Powershot S95 MOV Converter. Transfer h.264 encoded .mov files from Canon Powershot S95 camcorder to your computer via USB cable. Run Video Converter Platinum, and click the "Add Video" button or "Add from folder" icon to load H.264/MOV videos. Step 2. Set AVI/WMV as output format for editing.Click “Format” bar to determine output format. Follow “Common Video” and select any format from “AVI MSMPEG4-V3 (*.avi)”, “WMV3 (WMV9)(*.wmv)” and “WMV2 (WMV8)(*.wmv)”. 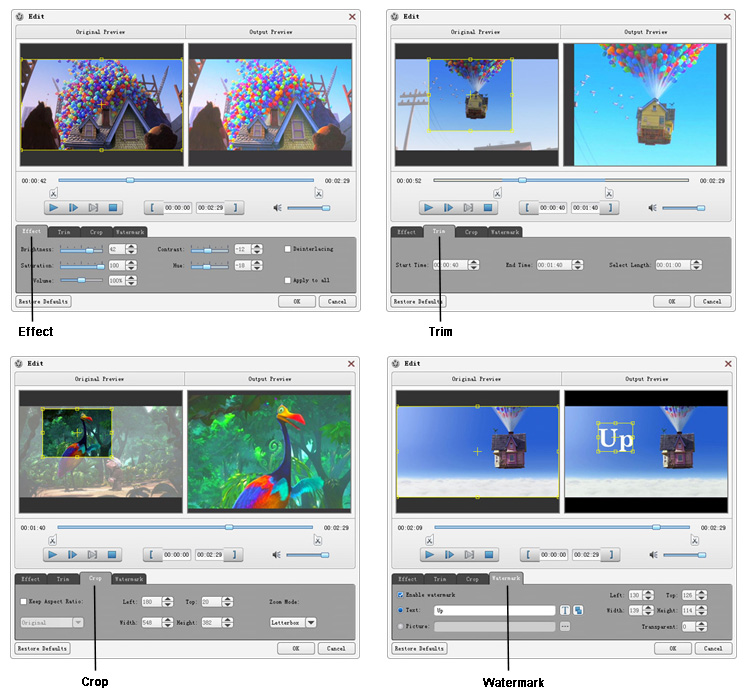 Step 3. Adjust video and audio settings to optimize output file quality . Step 3. Adjust video and audio settings to optimize output file quality .Click "Settings" button, then you will be able to adjust audio and video parameters on the popup window to customize the output file quality, these adjustable parameters include codec name, aspect ratio, bit rate, frame rate, sample rate, and audio channel. To maintain original HD quality, you may set “original” in the fields of “Size”, “Bitrate” and “Frame rate”. To downsize the Canon Powershot S95 .mov files, just set a smaller bitrate. Step 4. Click "Convert" button to convert Canon Powershot S95 MOV files to HD AVI/WMV.Once the conversion is finished by Canon Powershot S95 MOV to AVI/WMV Converter, you can click "Open" button to get the output files effortlessly. Now you have got it right, just import and edit S95 MOV files with Sony Vegas Platinum, Adobe Premiere or any other editing software you like. |
|
|
|
Post by cherrysteven on Jul 3, 2014 20:56:23 GMT -5
iDVD is a discontinued user-friendly DVD creation software application made for OS X by Apple Inc. iDVD allows the user to add QuickTime movies, MP3 music, and digital photos to a DVD that can then be played on a commercial DVD player. But for high definition video such as AVCHD MTS/M2TS clips, iDVD couldn’t always handle them well. If your HD camera itself is compatible with iDVD, you can simply connect your camcorder to Mac and let iDVD work for you by using “OneStep DVD”. Otherwise, in attempting of importing MTS to iDVD for “Create a New Project”, you have to convert AVCHD MTS to iDVD workable files in advance. AVCHD to iDVD Converter will make things easier for you. The following guide displays the details.  Step 1: Launch AVCHD to iDVD Converter and load MTS/M2TS source files to it. There are two ways available for loading AVCHD source files to this software, through “Add Video” button and “Add from folder” button.  Step 2: Select “MPEG-2 Video (*.mpg)” as target format for iDVD Step 2: Select “MPEG-2 Video (*.mpg)” as target format for iDVDIn iDVD, movies are converted into MPEG-2 format just before they are written to the DVD disc. You are allowed to select “MPEG-2 Video (*.mpg)” from profile format bar as output format and convert MTS/M2TS to MPEG-2 MPG for iDVD. Step 3: Adjust video and audio parameters for use in iDVDAVCHD to iDVD Converter allows users clicking “Settings” button and go to the “Profile Settings” panel below to adjust video and audio settings. High definition video is converted to work with the format of your project. iDVD supports using 16:9 widescreen video; therefore, when your DVD plays on a DVD player that supports widescreen format, the footage appears in its original aspect ratio. Basically the AVCHD footages are 1080p (1920*1080) or 720p (1280*720), to keep the original 16:9 aspect ratio and prepare your videos for use in iDVD, you can set advanced video and audio settings as below: Video: mpeg2video, 960*540p, 9800kbps, 29.97fps Audio: mp2, 44.1khz, 128kbps, Stereo channels Step 4: Convert AVCHD MTS to iDVDClick the “Convert” button to start MTS/M2TS to MPEG-2 MPG Conversion. When the conversion task is done, click “Open” button to get the converted files for creating DVD with iDVD. The way iDVD works is simply by dragging the converted MTS files into the Drop Zone shown in the image above. It gives you all the tools to create professional-quality DVDs using your own AVCHD videos. Sharing your memories has never been easier. 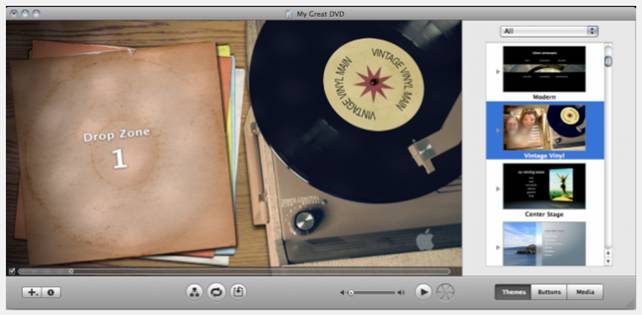 |
|
|
|
Post by cherrysteven on Jul 6, 2014 20:44:41 GMT -5
Question - I have some purchased DVD movies that I would like to edit in Final Cut Pro X. My objective is making videos using scenes from my DVD. The problem is that I can not get the video and sound into FCP X, because DVD video does not natively work within FCPX. Can anyone figure me out how to start? Quick Answer - Bring DVD movies into Final Cut Pro X, Final Cut Pro 6/7, and Final Cut Express is simple! Convert your DVD footage with DVD Ripper for Mac, by transcoding DVD into a format that works natively within your non-linear video editing applications. In detail, ripping DVD to Apple ProRes 422 for FCP, and encoding DVD to AIC for Final Cut Express. Ripping media off a DVD to insert in your video project isn’t a difficult thing. In this example we’ll demonstrate how to rip DVD video for use in FCP, FCP X, and FCE. Follow these simple steps: 1. Download DVD Ripper for Mac, start up it and then open your DVD in the application by clicking DVD disc icon from the menu bar. The best DVD to Final Cut Converter software will recognize all movies titles in your DVD so that you can easily tick off a movie title that you want to rip. 2. DVD Ripper for Mac will let you convert your DVD to a wide variety of video formats. Choose the format that best matches your project settings. Apple ProRes (Apple’s intermediate codec optimized for post production) is typically a good choice for converting your DVD video for use in Final Cut Pro 6/7 and Final Cut Pro X. Apple InterMediate Codec (AIC)(*.mov) is typically a good choice for converting DVD video for edit with FCE. 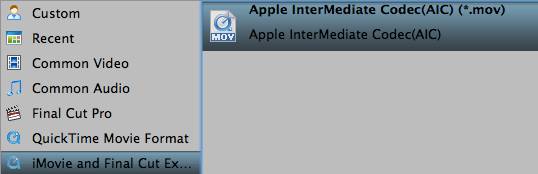 3. Click “Convert” button to rip DVD to edit in FCP, FCP X, and FCE on Mac. When finished, click “Open” button to get the generated files for use in Final Cut Pro X, Final Cut Pro 6/7, and Final Cut Express. Import your clips into Final Cut Pro X and get to editing: File > Import > Files… 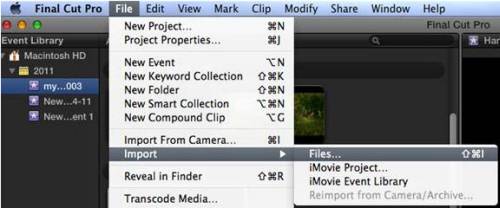 Import your clips to Final Cut Pro 6/7: File > Import > Files… 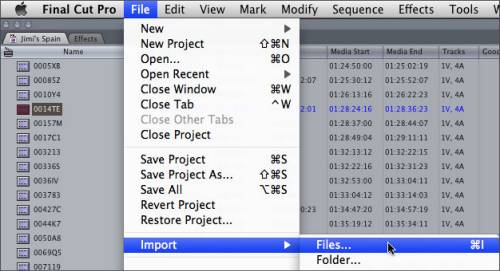 Import your clips to Final Cut Express: File > Import > Files… 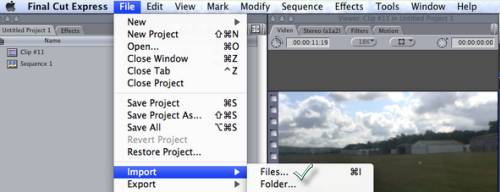
|
|
|
|
Post by cherrysteven on Jul 7, 2014 21:29:37 GMT -5
 Apple announced that more than 3 million of the new iPad has been sold since March 16. There is no doubt that the new iPad 3 takes the first place in the tablet PC market, though more and more Android tablets are said to be the new iPad’s killer. Taking the advantage of the 2048 x 1536 definition display Retina screen, the new iPad 3 provides a more authentic image performance that other tablets do not offer. The new iPad 3 only supports MPEG-4 and H.264 video codec for playback, as a result of which, other video formats like MKV is not able to be played on this powerful tablet. So, how can we enjoy new iPad 3 MKV movies is the most common problem that remains to be solved. If you have a Mac computer and many MKV videos in HD quality and want to play 1080p MKV video with the new iPad 3, you can try to convert full HD MKV for new iPad 3 on Mac. Recommended useful the new iPad 3 MKV converter on Mac: Mac Video Converter Platinum Guide: How to transcode 1080p MKV to the new iPad on Mac?Step 1: Import and preview.Click the add button and browse to choose the MKV videos you want to convert to Mac 1080p MKV to iPad 3 converter. Then the video files are displayed on the task window in turns. You can double click the video to preview the video at the preview window. 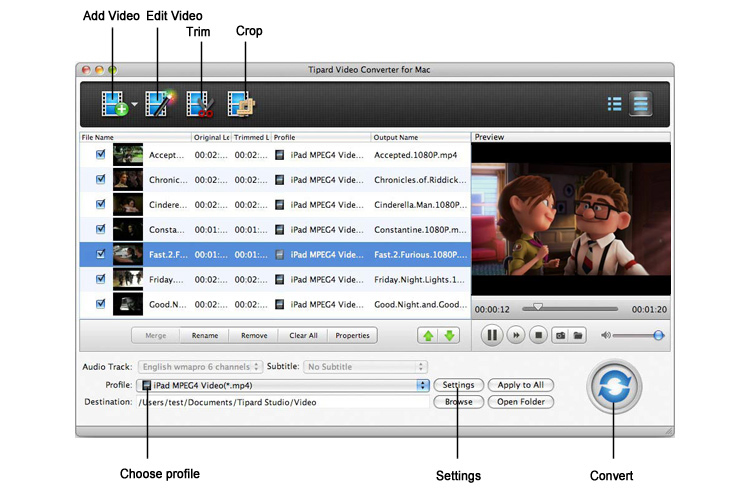 Step 2: Choose and set. Step 2: Choose and set.To convert 1080p MKV to 720p for new iPad 3 on Mac, you need choose a compatible output format for the new iPad. Mac 1080p MKV to iPad 3 converter provides particular H.264 and MPEG-4 video format for the new iPad. Just click the format bar and choose iPad >> iPad 3 HD Video (*.mp4). 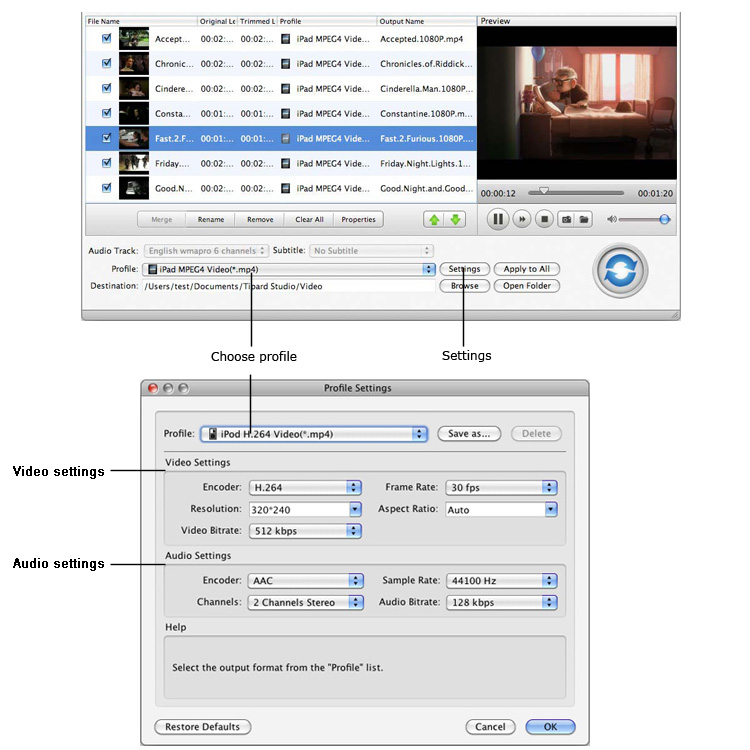 Tips: This profile exports video with 720p video size, if you want to experience the Full HD on the new iPad, just choose iPad 3 Full HD Video (*.mp4). Step 3: Optimize the settings.If you do not satisfy with the default setting for the new iPad, you can click the settings button and adjust the video and audio parameters by yourself. Step 4: Convert 1080p MKV to the new iPad 3 720p MP4 video.After the settings have been completed, you need click the convert button and start to convert 1080p MKV to the new iPad 3 720p MP4 video on Mac. After the conversion you can get the HD MP4 videos and you are able to play MKV video with the new iPad 3 with ease. 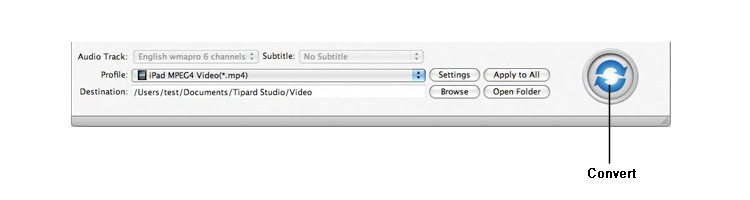 |
|
|
|
Post by cherrysteven on Jul 9, 2014 2:19:52 GMT -5
So many Apple admirers adore iPad as the best movie player because of its simple operation, stunning display resolution and suitable size to carry away on the go. Unfortunately, Apple’s lack of Adobe Flash Player support fails users to watch online videos from Vimeo, Megavideo, Dailymotion, etc. You might mention jailbreaking to enable iOS to run flash player, while not all Apple users would like to take the risk to ruin their brand new iPad. Is there other way to play Flash videos on iPad without jailbreaking? Luckily, you are able to find answers in below article, which offers you two methods for watching Flash videos on your iPad without jailbreaking. Method 1: Use apps and software to watch Flash videos on iPadMany apps are available in APP Store to help watch Flash videos on iPad. You could download one or more to iPad and watch Flash videos. iOS Flash Video - Free iOS Flash Video is slightly different from the other items on this list in that it’s a bookmarklet you can add to your iPad’s browser rather than a stand-alone app. Consequently, the set-up process is slightly more complex than simply downloading an app. To use the bookmarklet, you have to download OPlayer or OPlayer Lite from the app store. Then, save the iOS Flash Video page as a bookmark, edit the code slightly, and you’re ready to start watching Flash videos. This bookmarklet only supports certain video sites; however several big names make the list, including Facebook, Dailymotion, Vimeo, MegaVideo and Blip.tv. Cloud Browse Cloud Browse provides a full Firefox browsing session on your iPad, and supports both Flash and Java content. The app works by hosting a desktop Firefox session through your device, overcoming Apple’s Flash restrictions and providing a fast browsing experience in the process. The basic version of Cloud Browse costs $2.99, and this provides you with 10 minutes of secure, anonymous browsing per session. For unlimited secured browsing, and to get rid of the adverts, you need to pay a monthly subscription, which starts at the equivalent of just over $4 per month. iSwifter iSwifter allows you to unlock Flash content on your iPad, leaving you free to watch Flash videos, browser Flash websites and use interactive Flash applications, including games. You can use the app in place of or in addition to the iPad’s Safari app, and it’s free to download and try iSwifter for the first seven days, after which you need to make a $4.99 in-app purchase to carry on using it. Skyfire Like iSwifter, Skyfire acts as a replacement for alternative iPad browsers. Specifically designed for users to watch Flash videos, Skyfire also contains a Video Recommendation Engine, which suggests other videos you might enjoy. The app only caters for Flash videos, so doesn’t support Flash games or applications, however if you’re looking for an app primarily to watch video clips, Skyfire is a popular choice. Photon Flash Browser  At $4.99, Photon Flash Browser is one of the pricer apps on the list, however it has a range of features that will make the $5 worthwhile to many Flash lovers. As well as supporting Flash videos, and use Flash games and apps, Photon Flash Browser allows you to multi-task using multiple tabs, turn on private browsing, share content through Facebook, print using AirPrint, and save your favorite pages as bookmarks. Method 2: Convert Flash videos to iPad compatible MP4 If you don’t want to spend extra money on flash web browser while Flash videos have been downloaded on your PC, you can use Video Converter Platinum to convert and transfer Flash videos from computer to iPad smoothly. 1. Download this FLV to iPad Converter software, install and launch it. 2. Click “Add Video” button to import Flash video files to the recommended iPad FLV Converter. Or simply drag & drop video files to the program interface.[/b] 3. In the “Format” drop-down list, select optimized profile from iPad Tab for your device. 4. Hit the “Convert” button to start converting Flash FLV to iPad MP4. |
|
|
|
Post by cherrysteven on Jul 9, 2014 22:15:37 GMT -5
Canon has produced many professional camcorders, such as XF series, include XF305, XF300, XF105, XF100, etc. these professional camcorders can help us record vivid images. You may have used Canon XF series camcorders to record many high-definition footages which are in MXF video format, this video format is good for record videos, but it’s not compatible with many editing software, such as iMovie on Mac. You may have the need to import Canon MXF to iMovie for editing, but the iMovie doesn’t support MXF files directly. How to import Canon MXF to iMovie for editing? The best way is to convert Canon MXF to iMovie supported video format. iMovie best supported video format is Apple InterMediate Codec MOV format. You can convert recorded Canon mxf to AIC MOV for iMovie easily, please follow the guide below. 1. Download MXF Converter for Mac. This is an excellent Mac MXF to AIC MOV converter, which can help you transcode MXF files to any formats you want. 2. Install and launch this MXF to iMovie converter, import Canon MXF footages to the software. 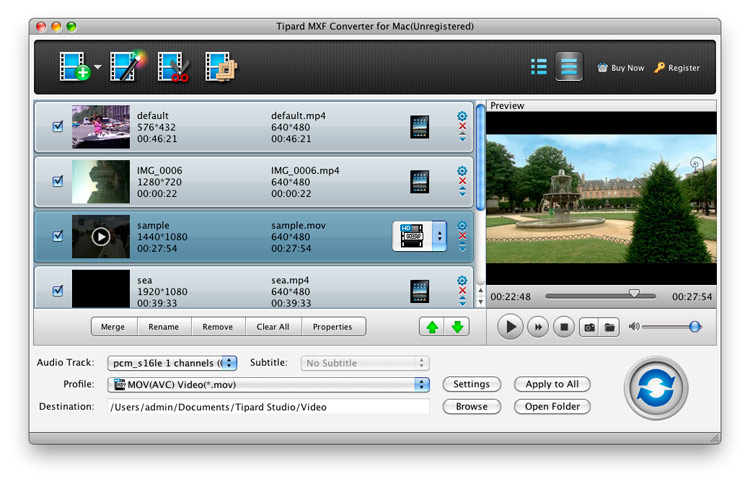 3. Click format bar to choose the output format. 4. You can click Settings button to adjust the output parameters such as resolution and bitrate, you can also keep it as original. 5. Click convert button to start converting MXF to AIC for iMovie |
|
